Deckz
Registered User
DOWNLOAD (FileFront), or DOWNLOAD (MegaUpload).
---------------------------------------------------------------------
Sorry, it took me a while to upload this, but finally at home and enough time to do it.
Here are all of the balls in this patch:
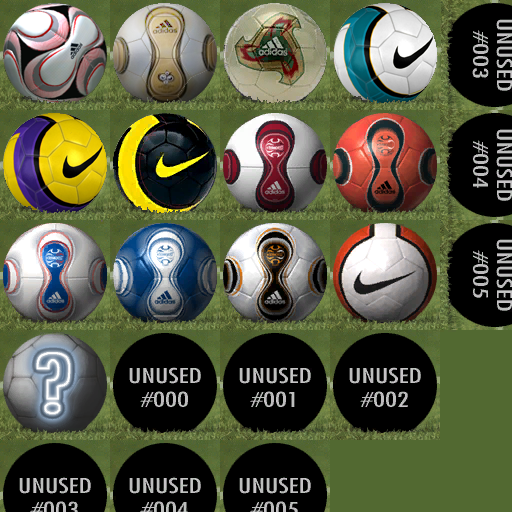
The same screenshot in an alternate location HERE (incase my "Monthly Photobucket Bandwidth" Limit runs out)
---------------------------------------------------------------------
**INSTALLATION INSTRUCTIONS**
Download afs_explorer here:
http://downloads.gamingaccess.com/index.php?file_id=14508
1.Open afs explorer, and click on
File>Import AFS Files
2.When the Open Dialog Box appears, click on 'All Files (*.*)' on the 'Files of type:' drop down menu.
3.Now find your .img file in your PES2008 directory, it would ask if you would like to rebuild file, if you decide to do so, remember to save it as a .img (click on 'All Files (*.*)' again) in another location (with the same name as the origial file).
4.Click ACTION>IMPORT FOLDER, then locate the relevant folders (downloaded patch folder) and click OK.
If asked whether you want to modify reserved space, click yes and save a new name for the .img file.
Once the file is patched, delete or back up your old .img file and rename your new one to the correct name (cv_0.img or cv_1.img).
Alternate Method:
1.Open afs explorer, and click on
File>Import AFS Files
2.When the Open Dialog Box appears, click on 'All Files (*.*)' on the 'Files of type:' drop down menu.
3.Now find your .img file in your PES2008 directory, it would ask if you would like to rebuild file, if you decide to do so, remember to save it as a .img (click on 'All Files (*.*)' again) in another location (with the same name as the origial file).
4.When everything has loaded, try importing the edited .bin files again (drag & drop from folder to a file listed on the program is possible, but make sure you drop it on the appropiate file), it would would ask if you would like to reserve space, click yes.
If it fails, another error message would appear.
5.If this is the case, click on the hammer icon with the rainbow gradient background (leaving your mouse over the button would show 'Modify reserved space...')
6.A new dialog box would open, and on the right you would see colour coded numbers only for the file(s) you wish to edit (colour for other files remain black). These numbers indicate the reserved space that is going to be availible after this process (the reserved space is automatically altered only for the files you attempted to edit). If you wish to manually change the reserved space for a specific file, you may do so in the top right corner.
7.Once everything is done, click on 'Regenerate AFS!'. Rebuilding a new .img is required for this step (same as the rebuilding part in step 3).
Remember to save it as the original file name in another location.
8.Once the .img file is rebuilt, open it and you should now be able to import the .bin files you were previously unable to.
9.When the desired bin files has all been updated, close the program and backup your original .img in a safe location and place your new edited .img into the original PES2008 directory with it's orginal file name and you're done.
In this case, the .img files are cv_0.img and cv_1.img
---------------------------------------------------------------------
If I create anymore ball patches, they would be listed here (hence the thread name 'Ball Patches').
...But just like the Championship Patch, I would not be taking most requests, but I still welcome you for suggestions.
Hope you enjoy...
Deckz.
---------------------------------------------------------------------
Sorry, it took me a while to upload this, but finally at home and enough time to do it.
Here are all of the balls in this patch:
The same screenshot in an alternate location HERE (incase my "Monthly Photobucket Bandwidth" Limit runs out)
---------------------------------------------------------------------
**INSTALLATION INSTRUCTIONS**
Download afs_explorer here:
http://downloads.gamingaccess.com/index.php?file_id=14508
1.Open afs explorer, and click on
File>Import AFS Files
2.When the Open Dialog Box appears, click on 'All Files (*.*)' on the 'Files of type:' drop down menu.
3.Now find your .img file in your PES2008 directory, it would ask if you would like to rebuild file, if you decide to do so, remember to save it as a .img (click on 'All Files (*.*)' again) in another location (with the same name as the origial file).
4.Click ACTION>IMPORT FOLDER, then locate the relevant folders (downloaded patch folder) and click OK.
If asked whether you want to modify reserved space, click yes and save a new name for the .img file.
Once the file is patched, delete or back up your old .img file and rename your new one to the correct name (cv_0.img or cv_1.img).
Alternate Method:
1.Open afs explorer, and click on
File>Import AFS Files
2.When the Open Dialog Box appears, click on 'All Files (*.*)' on the 'Files of type:' drop down menu.
3.Now find your .img file in your PES2008 directory, it would ask if you would like to rebuild file, if you decide to do so, remember to save it as a .img (click on 'All Files (*.*)' again) in another location (with the same name as the origial file).
4.When everything has loaded, try importing the edited .bin files again (drag & drop from folder to a file listed on the program is possible, but make sure you drop it on the appropiate file), it would would ask if you would like to reserve space, click yes.
If it fails, another error message would appear.
5.If this is the case, click on the hammer icon with the rainbow gradient background (leaving your mouse over the button would show 'Modify reserved space...')
6.A new dialog box would open, and on the right you would see colour coded numbers only for the file(s) you wish to edit (colour for other files remain black). These numbers indicate the reserved space that is going to be availible after this process (the reserved space is automatically altered only for the files you attempted to edit). If you wish to manually change the reserved space for a specific file, you may do so in the top right corner.
7.Once everything is done, click on 'Regenerate AFS!'. Rebuilding a new .img is required for this step (same as the rebuilding part in step 3).
Remember to save it as the original file name in another location.
8.Once the .img file is rebuilt, open it and you should now be able to import the .bin files you were previously unable to.
9.When the desired bin files has all been updated, close the program and backup your original .img in a safe location and place your new edited .img into the original PES2008 directory with it's orginal file name and you're done.
In this case, the .img files are cv_0.img and cv_1.img
---------------------------------------------------------------------
If I create anymore ball patches, they would be listed here (hence the thread name 'Ball Patches').
...But just like the Championship Patch, I would not be taking most requests, but I still welcome you for suggestions.
Hope you enjoy...
Deckz.


